|
|

Digital Image Processing
|
Outline |
Mind Map |
|
|
Digital Image Processing
|
Outline |
Mind Map |
To begin study of the module,
CLICK
HERE.
|
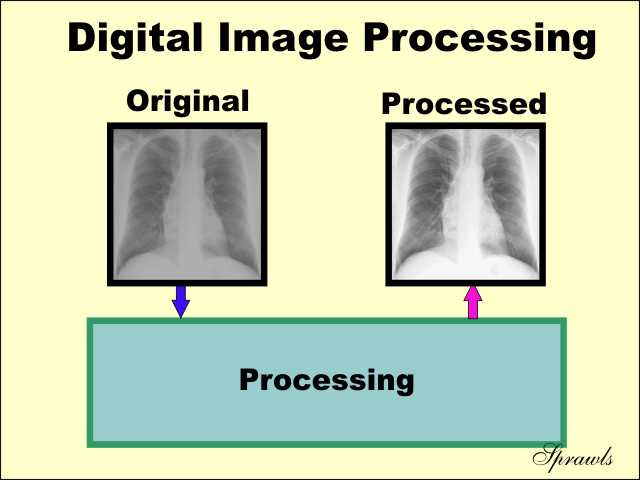
These procedures can be selected and adjusted to change the characteristics of the images, usually for the purpose of improving quality or optimizing characteristics for maximum visibility. In this module we consider several of the processing methods, especially those that apply to digital radiography. |
|
Three possibilities include processing methods to:
Some type of digital image processing is used with most of the medical imaging modalities. |
|
Both of these are used in digital radiography as well as with many of the other imaging modalities. |
 Here
we are using a very simple image to show how digital processing can be
used to change the image contrast. Here
we are using a very simple image to show how digital processing can be
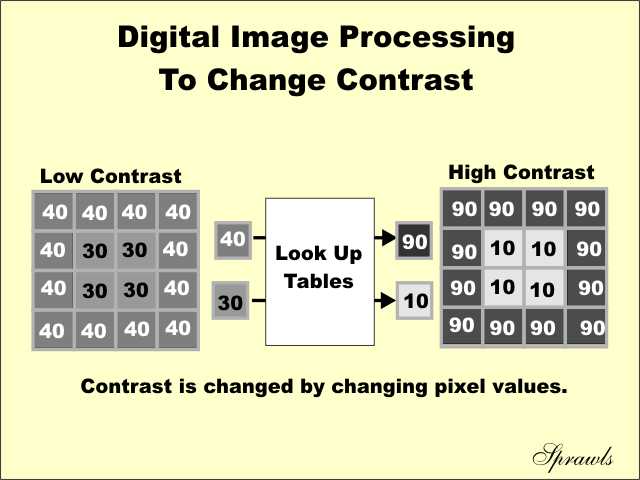
used to change the image contrast.As we see, the image consist of a background area and a small square object in the center. In the low contrast image on the left the background area has pixel values of 40 and the object in the center has pixel values of 30. The numerical contrast (the object relative to the back ground) is the difference (40-30=10). Look up tables (LUT) are data stored in the computer that is used to substitute new values for each pixel during the processing. In our example here, we are keeping it simple and working an image with only two pixel values, 40 and 30. As we see here, the processing uses a LUT that substitutes a 90 for a 40 and a 10 for a 30. The effect of this is to increase the image contrast (90-10=80). As we are about to discover, it is usually possible for the user to select from a variety of LUTs, each one designed to produce specific contrast characteristics. |
|
It is very helpful to show this relationship between the original pixel values and the new values with a graph as we see here. Here we are starting with a simple straight-line or linear graph that shows that the substituted number is the same as the original image pixel value. Processing with this LUT does not change the image, it just introduces us to the concept of LUTs. |
|
Here we see that relationship shown as a curve. Note that the values and positions on the scale for the three pixel values represented by the colors ( yellow, green, and red) are now different in the processed image. You might recognize the shape of this curve as being similar to that of a radiographic film characteristic (H & D) curve. That is intentional. By processing a digital radiograph with a LUT with this characteristic it then takes on some of the familiar contrast "look" of a radiograph recorded on film. |
|
Here we see curves representing three different LUTs. Like the characteristic curve of film, the slope of the curve at every point represents how the contrast will be changed by the processing. Where the curve has a high slope (steep) the contrast will be increased by the processing. If the slope is small (less than 450) the contrast will be decreased by the processing. The curve with the greater slope shown here will produce an image with high contrast. The one with less slope simulates the latitude type film that is used for chest imaging. We will see the effect of processing with the inverted curve a little later. |
|
The appropriate LUT is then automatically selected to give the desired contrast characteristics to match the type of procedure (chest, extremity, etc) that is designated by the operator. |
|
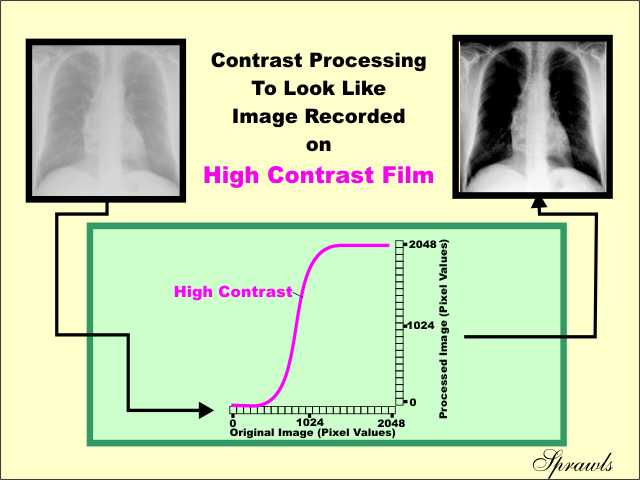
The usual procedure is to use processing, as illustrated here, to increase the contrast for some selected portion of the exposure range. The processing illustrated here produces an image that is similar to one recorded with a high contrast film. Note: we do not generally use a high contrast film for chest radiography because it produces an image with too much area contrast (like the dark lungs shown here). |
|
In general, it simulates an image recorded on a latitude type film that is used for chest imaging. Compared to the high contrast processing that we have just seen, this produces an image with good object and anatomical structure contrast and visibility throughout most of the image. |
|
Some objects and structures might be more visible and easier to detect on the inverted image. The inversion can be achieved by processing with a LUT as illustrated here. |
|
Windowing is the process of selecting some segment of the total pixel value range (the wide dynamic range of the receptors) and then displaying the pixel values within that segment over the full brightness (shades of gray) range from white to black. Important point...Contrast will be visible only for the pixel values that are within the selected window. All pixel values that are either below or above the window will be all white or all black and display no contrast. The person controlling the display can adjust both the center and the width of the window. The combination of these two parameters determine the range of pixel values that will be displayed with contrast in the image. |
|
With windowing we can create many displayed images, each one "focusing on" a specific range of pixel values. As we see here, when the window is set to cover the lower segment of total pixel value range, we see good contrast in the lighter areas like the medistimum. Setting the window to the higher segment produces good contrast in the darker areas like the lungs. |
|
Important point....This process does not un-blur an image and recover detail that was completely lost because of blurring from the focal spot, motion, and the receptor. What it does do is increase the visibility (contrast) of some objects, especially where the visibility of the objects is somewhat limited by large area contrast as in chest imaging. The process consist of two distinct steps. First, a blurred copy of the original image is produced. A common form of digital processing that can be used to produce a blurred image is just by replacing each pixel value with the average of the pixel values in it's neighborhood. This produces a "blurred mask" image. The blurring removes all detail from the image (that is what blurring does!). We now have two images. The original image contains the general large-area contrast background plus some detail. The blurred mask image contains only the large-area contrast background The final step is where the computer subtracts the blurred mask image (actually some fraction of it) from the original image. This process reduces the large-area contrast background in relation to the contrast of the detail. The result is that the contrast and visibility of the detail (small objects and structures) in enhanced. |
|
To return to the beginning,
|
|
To return to the beginning,
|
 One
of the major advantages in having medical images in digital form is the
ability to perform a variety of processing procedures with a computer.
One
of the major advantages in having medical images in digital form is the
ability to perform a variety of processing procedures with a computer.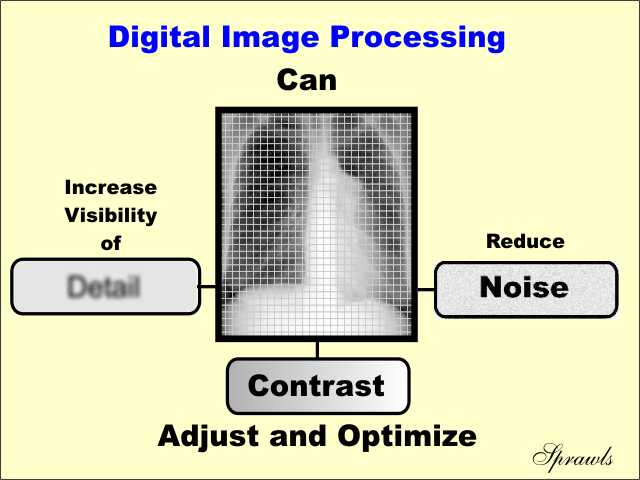 Processing
of digital images can be used to change most image characteristics.
Processing
of digital images can be used to change most image characteristics.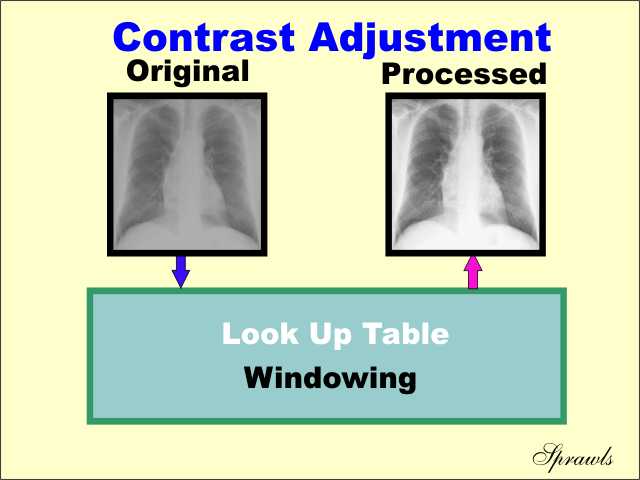 There
are several digital processing methods that can be used to adjust the
contrast characteristics of an image. The two methods that we will
consider here are:
There
are several digital processing methods that can be used to adjust the
contrast characteristics of an image. The two methods that we will
consider here are: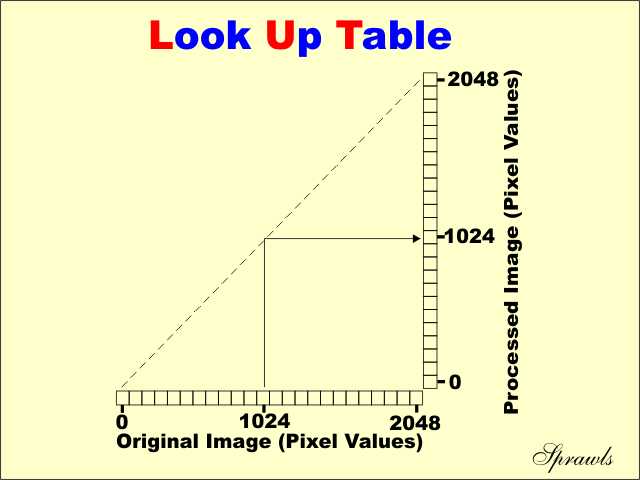 Let's
recall that a LUT indicates what number is to be substituted for each
pixel value during the processing of the image.
Let's
recall that a LUT indicates what number is to be substituted for each
pixel value during the processing of the image.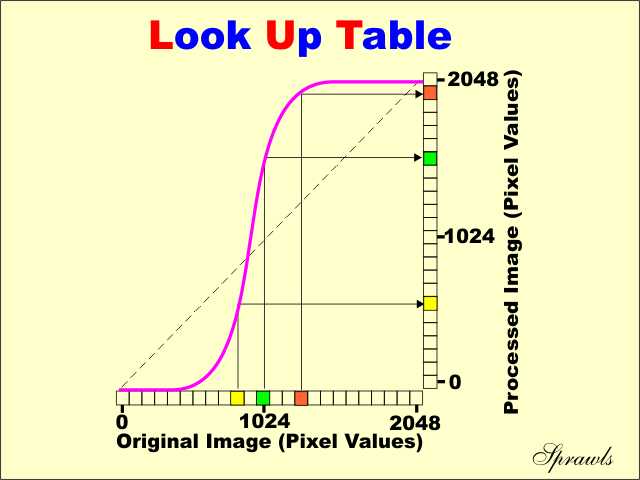 If
LUT processing is to change the contrast characteristics of an image it
must substitute numbers that are different from the original pixel
values.
If
LUT processing is to change the contrast characteristics of an image it
must substitute numbers that are different from the original pixel
values.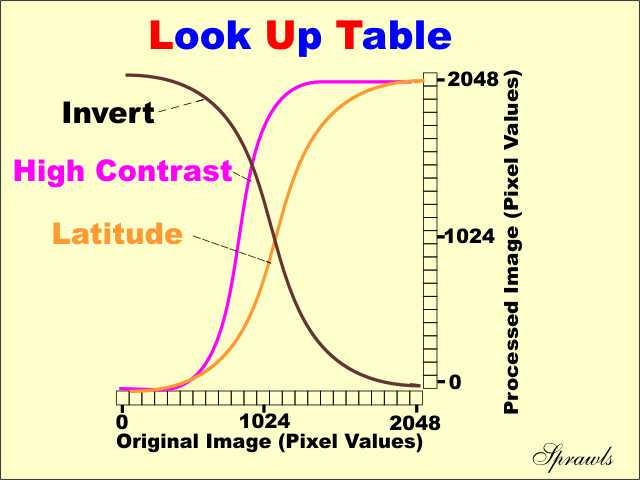 One
of the advantages of digital processing is that the processing
parameters (factors) can be selected to produce images with different
contrast characteristics.
One
of the advantages of digital processing is that the processing
parameters (factors) can be selected to produce images with different
contrast characteristics.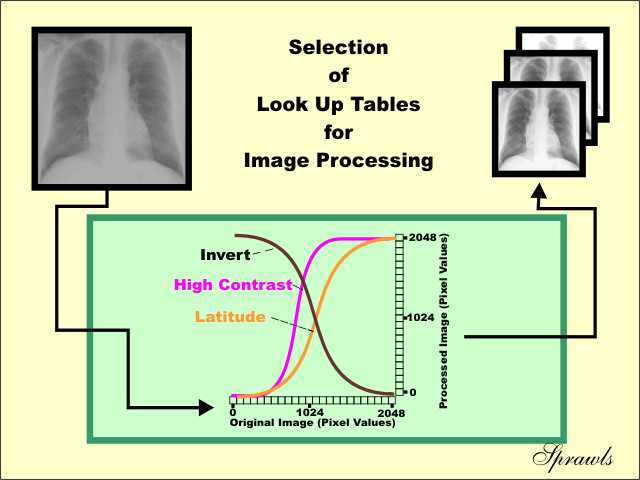 In
the typical digital radiographic system, a variety of LUTs are
installed.
In
the typical digital radiographic system, a variety of LUTs are
installed.
 If
he original image recorded with most digital radiography systems is
displayed directly, it might have relatively low contrast as we see with
the image on the left. This is because of the wide dynamic
exposure range and the linear response of the digital radiographic
receptors. This is actually a desirable characteristic because a
wide range of exposure is recorded and the digital receptor does not
suppress or cutoff the contrast in some of the exposure range as happens
with images recorded directly on film.
If
he original image recorded with most digital radiography systems is
displayed directly, it might have relatively low contrast as we see with
the image on the left. This is because of the wide dynamic
exposure range and the linear response of the digital radiographic
receptors. This is actually a desirable characteristic because a
wide range of exposure is recorded and the digital receptor does not
suppress or cutoff the contrast in some of the exposure range as happens
with images recorded directly on film.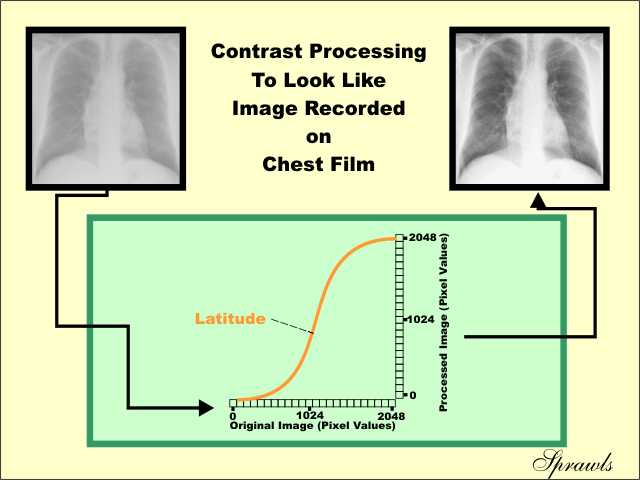 Here
we see LUT processing that is more appropriate for chest radiography.
Here
we see LUT processing that is more appropriate for chest radiography.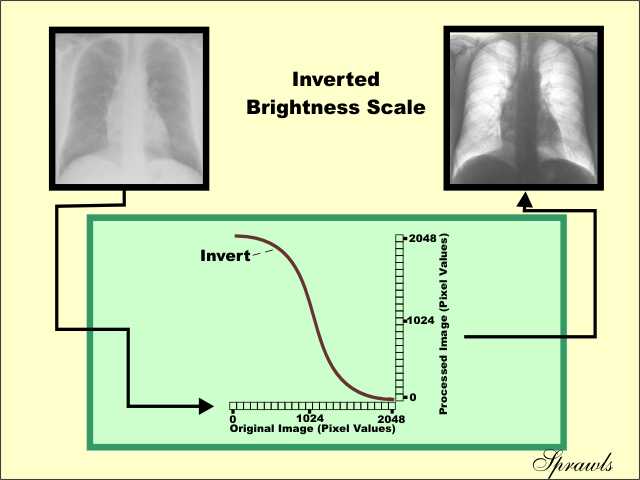 Many
radiologist find value in having an inverted (black bone) image in
addition to the conventional (white bone) image at the time of viewing.
Many
radiologist find value in having an inverted (black bone) image in
addition to the conventional (white bone) image at the time of viewing.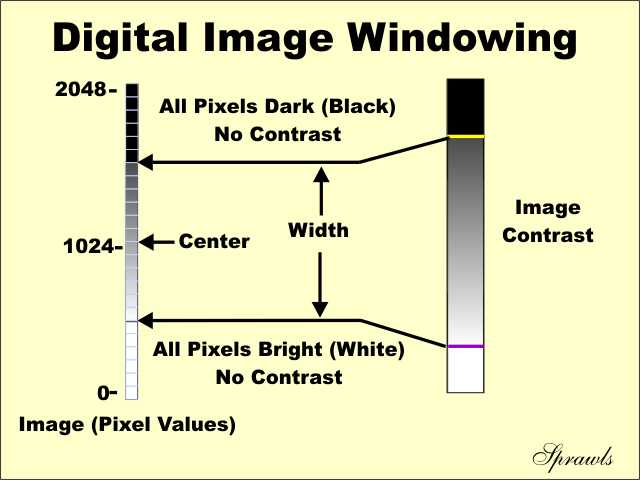 The
ability to window is a valuable feature of all digital images.
The
ability to window is a valuable feature of all digital images.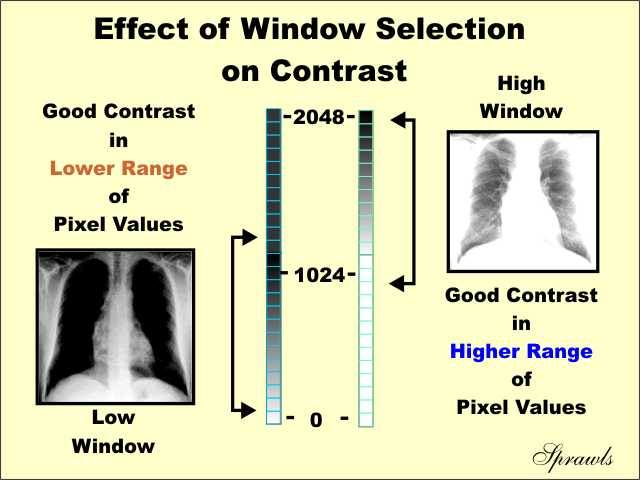 One
of the advantages of windowing is that it makes it possible to display
and enhance the contrast in selected segments of the total pixel value
range. This can be compared to the limitations of images displayed
on film where the full range of exposure is displayed in one image and
cannot be changed.
One
of the advantages of windowing is that it makes it possible to display
and enhance the contrast in selected segments of the total pixel value
range. This can be compared to the limitations of images displayed
on film where the full range of exposure is displayed in one image and
cannot be changed.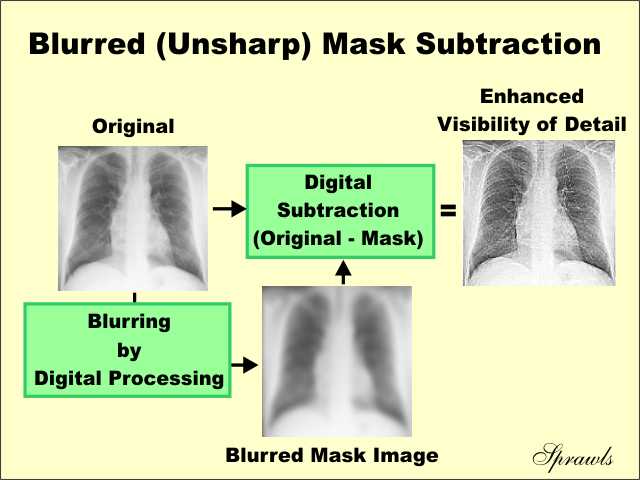 The
Blurred Mask Subtraction is often used, especially in digital
radiography, to enhance the visibility of detail in certain clinical
procedures.
The
Blurred Mask Subtraction is often used, especially in digital
radiography, to enhance the visibility of detail in certain clinical
procedures.